How to install, update, disable, enable and uninstall
🚨 NB! Before you begin
The driver does not do any setup of your BMS/battery. You need to have a working battery before you start.
It is always recommended to use the latest Venus OS version with the latest driver version. To avoid a white screen after install check the compatibility matrix below.
Multi battery setup: If you are using multiple batteries you need to use a battery aggregator else you cannot use the full system power. See How to aggregate multiple batteries?
The Bluetooth and CAN connections are still not stable on some systems. If you want to have a stable connection use the serial connection.
Compatibility Matrix
| ↓ Venus OS version \ Driver version → | v0.12.0 | v0.13.0 | v0.14.x | v1.0.0 |
|---|---|---|---|---|
| v2.80 - v2.84 | x | x | untested | untested |
| v2.85 - v2.89 | x | x | untested | untested |
| v2.90 - v2.94 | untested | x | x | x |
| v3.00 | untested | untested | x | x |
| v3.00 | untested | untested | x1) | x |
| v3.00 - v3.20~30 | untested | untested | x1) | x |
- Partially supported. Empty values/pages are not hidden in the GUI
Default hard limits
The driver currently implement some hard limits. Make sure your device is set up correctly and can handle these limits before you install.
50Acharge60Adischarge2.9Vmin cell voltage3.45Vmax cell voltage
The cell voltages is used along with the cell count to set the battery voltage (e.g. for 16 cells your battery min voltage will be 3.1 * 16 = 49.6V and max coltage 3.45 * 16 = 55.2V)
This limits can be changed in the settings. See How to change the default limits and Settings location/path.
Settings for your BMS/battery
You need to first set up your BMS hardware to match your cells. You would do this, if you build you own battery or your manufacturer/installer have done this for you. The important steps:
- Use the same cells (type, branch and capacity) and make sure they are balanced.
- You need to correctly set your battery capacity to match the cells you are using. Your SoC calculation in your BMS will be wrong otherwise. If you use
120Ahcells then your battery capacity will be120Ahetc. - You need to correctly set your min/max cell protection voltages. These are voltages when your BMS will disconnect to protect your cells like
2.85Vand3.65V. Your driver limits should be between these and NOT the same.
Settings for your GX device
-
You need to have a Venus OS device set up and running on your GX system (VenusGX, Cerbo, Raspberry Pi, etc.) and connected to your inverter. In VRM look under the device list for your installation. If you can see the Gateway (GX) and Ve.Bus System (inverter) then your GX is ready.
-
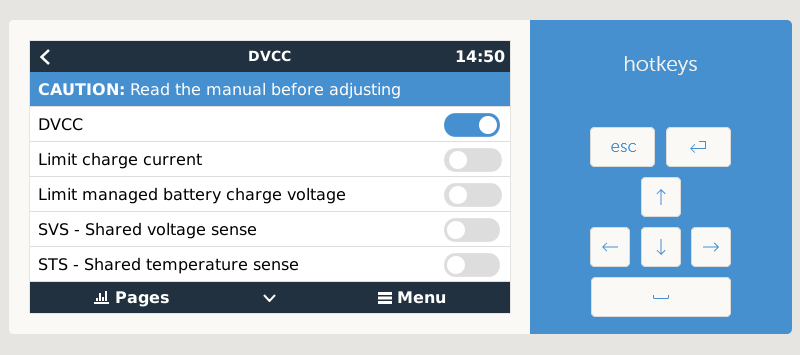
On your GX device you should set DVCC On. This will enable your battery to request charge parameters. All the Share Sense option can be Off. If your battery works with lower limits, enable Limit Charge Current, Limit managed battery Charge Voltage and set the lower values as required. You can also enable Limit inverter power for Discharge Current limit under ESS. These settings will be remembered between updates.
-
You also need to connect your BMS to the Venus OS device using a serial interface. Use the cable for your BMS or a Victron branded USB→RS485 or USB→Ve.Direct (RS232) cable for best compatibility. Most FTDI/FT232R/CH340G USB→serial also works. The FT232R and CH340G already has a driver included in the Venus OS.
🚨 NB! Only connect Rx & Tx or A & B to the BMS, if you are NOT using an isolated (galvanic isolation) cable or adapter. This prevents the current to flow through the adapter, if the BMS cuts the ground. Else it will destroy your BMS, GX device or Raspberry Pi.
Install or update
Install or update automatically with USB/SD card
It might be, that this doesn't work on older CerboGX devices. In this case use SSH option instead.
-
Download and copy the latest release
venus-data.tar.gzto the root of a USB flash drive that is in FAT32 format (a SD card is also an option for GX devices, but not for Raspberry Pi). -
OPTIONAL (
>= v1.0.0): Create aconfig.inifile in the root of your USB flash drive with your custom settings. Put[DEFAULT]in the first line of the file and add all the values you want to change below. You only have to insert the values you want to change, all other values are fetched from theconfig.default.ini. In theconfig.default.iniyou find all possible settings that you can copy over and change.If you put a
config.iniin the root of the USB flash drive, then an existingconfig.iniwill be overwritten. -
Plug the flash drive/SD into the Venus device and reboot. It will automatically extract and install to the correct locations and try the driver on any connected devices.
-
Reboot the GX (in the Remote Console go to
Settings→General→Reboot?).
Install or update over SSH
Require root access
-
Log into your Venus OS device using a SSH client like Putty or bash.
-
Run these commands to start the installer.
wget -O /tmp/install.sh https://raw.githubusercontent.com/Louisvdw/dbus-serialbattery/master/etc/dbus-serialbattery/install.sh

bash /tmp/install.sh
-
You can now choose which version you want to install:
-
Latest release Stable version, tested for more then a week.
-
Beta release Beta version, no errors after 72 h runtime, long time testing needed.
-
Nightly build Nightly version, newest features and fixes, bugs possible.
-
Latest release
Stable version, tested for more then a week.
Run the install script and select 1 or 2.
💡 Reboot the system after the installation finished with reboot.
Beta release
Beta version, no errors after 72 h runtime, long time testing needed.
Run the install script and select 3 or 4.
💡 Reboot the system after the installation finished with reboot.
Nightly build
Nightly version, newest features and fixes, bugs possible. Please keep your system monitored.
Not recommended in production environment, unless you know what you do. Testers are very welcome!
Run the install script and select 5 or 6.
💡 Reboot the system after the installation finished with reboot.
Specific version/troubleshooting option
Run the install script and select 7. Go to releases or releases and copy the link to the venus-data.tar.gz version you like to install. Paste the link with a right click and press enter.
💡 Reboot the system after the installation finished with reboot.
Local tar file
Place a venus-data.tar.gz file in the folder /var/volatile/tmp/ by copying/uploading it. Run the install script and select 8.
💡 Reboot the system after the installation finished with reboot.
BMS specific settings
- Daly BMS → Check Why is the battery current inverted? and Daly Lost Connection because of standby
- ECS BMS → Check #254 ECS BMS (comment)
- MNB BMS → Check MNB BMS setup
Since driver version >= v1.0.0 you can also get an overview of the BMS specific settings be checking the end of the config.default.ini.
Get BMS MAC address
Execute this commands to scan for Bluetooth devices and get their MAC address:
Command to execute
bluetoothctl
Output
Agent registered
[CHG] Controller xx:xx:xx:xx:xx:xx Pairable: yes
Command to execute
scan on
Output
Discovery started
[CHG] Controller xx:xx:xx:xx:xx:xx Discovering: yes
[CHG] Device xx:xx:xx:xx:xx:xx RSSI: -60
Command to execute
devices
Output with device MAC addresses
Device xx:xx:xx:xx:xx:xx JK-B2A24S15P
Command to execute
scan off
Output
Discovery stopped
[CHG] Device xx:xx:xx:xx:xx:xx RSSI is nil
[CHG] Controller xx:xx:xx:xx:xx:xx Discovering: no
Command to execute
quit
How to change the default limits
The driver currently uses a fixed upper current limit for the BMS:
50Acharge60Adischarge
Should you require more current and your battery can handle that, than you can change it in the settings. The values to change are:
MAX_BATTERY_CHARGE_CURRENT = 50.0
MAX_BATTERY_DISCHARGE_CURRENT = 60.0
If you use the cell voltage limits, temperature limits and/or SoC limits you also need to adjust their values to match the new current, else CCL and DCL will not change. See also Why is the charging/discharging current limit (CCL/DCL) smaller than the set one?.
Settings location/path
💡 After updating the settings, reboot the device or run /data/etc/dbus-serialbattery/reinstall-local.sh to apply the changes.
The path of the settings file depends on you driver version. If you don't know which driver version you have installed see Which version do I have installed?
Driver version <= v0.14.3 (utils.py)
Edit /data/etc/dbus-serialbattery/utils.py to update the constants. Note that any updates will override this change.
Driver version >= v1.0.0 (config.ini)
Copy the values you want to change from /data/etc/dbus-serialbattery/config.default.ini and insert them in the /data/etc/dbus-serialbattery/config.ini.
All available options can also be found here.
How to edit utils.py or config.ini
There are two ways to edit the files. You can edit them:
- Directly on the GX device/Raspberry Pi over SSH
- On your PC and then copy only the
utils.pyorconfig.iniover to the GX device/Raspberry Pi
See Settings location/path to know which file is relevant for you.
SSH edit using Nano editor (recommended)
Log into your GX device/Raspberry Pi using SSH and run this command. Replace FILE_NAME with the file name you want to edit, e.g. utils.py or config.ini.
nano /data/etc/dbus-serialbattery/FILE_NAME
You can use the arrow keys to scroll down and edit the values you need.
Use Ctrl + O (O like Oskar) to save and Ctrl + X to exit the editor.
Copy edited file from PC to GX device/Raspberry Pi
You can edit the file in a plain text editor on you PC like Notepad (Windows) or TextEdit (macOS). Then you need a program that can do SFTP like FileZilla (Windows/macOS/Linux), WinSCP (Windows) or Cyberduck (macOS).
Connect to your GX using the same login as with SSH and copy your edited file over the existing one at /data/etc/dbus-serialbattery/utils.py or /data/etc/dbus-serialbattery/config.ini.
⚠️ Sometimes it happens, that the line endings get changed from LF to CRLF with this method. Check the FAQ --> $'\r': command not found or syntax error: unexpected end of file to solve.
Don't copy all the files as the required file permissions will be destroyed and your driver might fail to start.
How to enable a disabled BMS
If your BMS is disabled by default, you have to enable it to get it working.
💡 See also How to edit utils.py or config.ini if you don't know how to edit a file.
Driver version <= v0.14.3
Edit /data/etc/dbus-serialbattery/utils.py and uncomment (remove the # as first line character) your BMS.
E.g.
# {"bms" : "Sinowealth"},
becomes
{"bms" : "Sinowealth"},
Edit /data/etc/dbus-serialbattery/dbus-serialbattery.py and check, if your BMS is already uncommented (without the # as first line character) your BMS.
Driver version >= v1.0.0 and <= v1.0.20230610beta
Edit /data/etc/dbus-serialbattery/dbus-serialbattery.py and uncommented (without the # as first line character) your BMS twice (# from ... and # {"bms": ...}).
Driver version >= v1.0.20230611beta
Add your BMS to the setting BMS_TYPE in the config.ini. This way you don't have to enable your BMS after every update.
Disable the driver
You can disable the driver so that it will not be run by the GX device. To do that run the following command in SSH.
bash /data/etc/dbus-serialbattery/disable.sh
You also need to configure your MPPTs to run in Stand alone mode again. Follow the Victron guide for Err 67 - BMS Connection lost.
Enable the driver
To enable the driver again you can run the installer.
bash /data/etc/dbus-serialbattery/reinstall-local.sh
Uninstall/remove the driver
To uninstall the driver run the uninstall script. The script is included from driver version >= v1.0.0.
bash /data/etc/dbus-serialbattery/uninstall.sh
To uninstall previous driver versions <= v0.14.3 run this commands:
Uninstall
# handle read only mounts
sh /opt/victronenergy/swupdate-scripts/remount-rw.sh

# remove files, don't use variables here, since on an error the whole /opt/victronenergy gets deleted
rm -rf /data/conf/serial-starter.d
rm -rf /opt/victronenergy/service/dbus-serialbattery
rm -rf /opt/victronenergy/service-templates/dbus-serialbattery
rm -rf /opt/victronenergy/dbus-serialbattery

# kill driver, if running
pkill -f "python .*/dbus-serialbattery.py"

# remove install script from rc.local
sed -i "/sh \/data\/etc\/dbus-serialbattery\/reinstalllocal.sh/d" /data/rc.local

# restore GUI changes
bash /data/etc/dbus-serialbattery/restore-gui.sh
If after the uninstall for some reason several items in the GUI were red, DO NOT reboot your GX device. See Uninstalling driver bricked my cerbo #576
Remove
If you want to remove also the install files of the driver run this after you run the uninstall script/commands:
rm -rf /data/etc/dbus-serialbattery
Downgrade from >= v1.0.0 to <= v0.14.3
With >= v1.0.0 the serial starter config is created differently and therefore you have to delete the /data/conf/serial-starter.d folder before downgrading to <= v0.14.3, else you will get an error like this during installation of <= v0.14.3:
tar: conf/serial-starter.d: Cannot open: File exists
tar: Exiting with failure status due to previous errors
To solve this proble run
rm -rf /data/conf/serial-starter.d
before the install script.